Hi There,
Recently I had to take out sometime out of my very busy schedule :P and put myself into something which I was about to loose out on, well people must have tried this out, but I feel this is worth sharing. So lets start..!!
I have put forward simple and clear steps to setup HTTPd Server (Apache WebServer), Tomcat, Apache JMeter and Curl for Windows for testing the WebApplications Fault Tolerance mechanism.
Steps in brief :
1. Install the Apache WebServer
For installing Apache WebServer as usual you can go to the internet i.e. https://httpd.apache.org/download.cgi, however you will be shocked to see that there is no Windows download for latest Apache release.
You might want to visit the site : http://www.eu.apache.org/dist//httpd/binaries/win32 for more information
As per their suggestions, you may have to choose any one of the below options to download Apache distribution.
"Popular options for deploying Apache httpd, and, optionally, PHP and MySQL, on Microsoft Windows, include:
So I managed to download it from the second option i.e. Apache Lounge. Download the latest Apache release from there unzip it and copy it in your desired folder.


To Install Apache WebServer in Windows follow below instructions.
1) Unzip and copy it to your desired directory, modify the path values in httpd.conf file as per your requirement.
For Example : DocumentRoot "E:/MyLAB/FailoverTest/Apache24/htdocs"
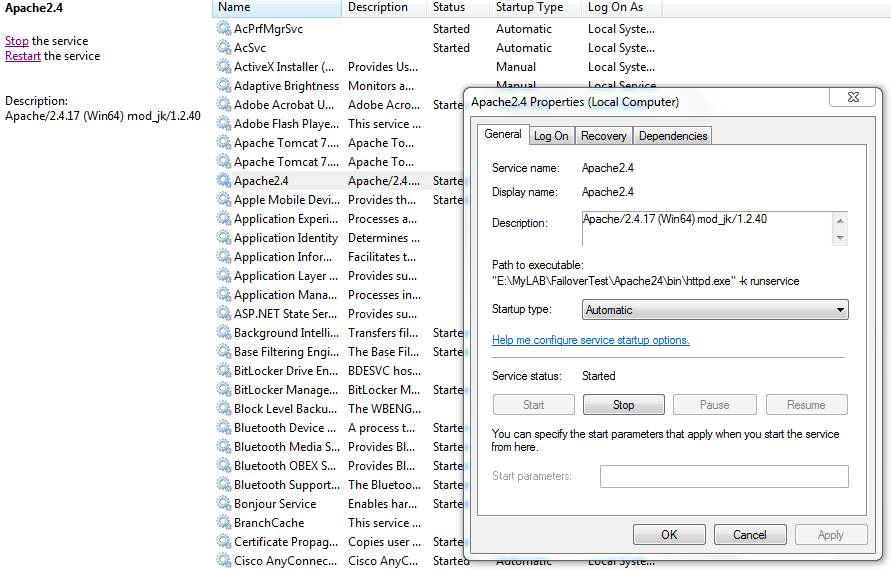
2) Install the Apache WebServer as Windows Service.
Open CMD shell and run the command httpd.exe -k install in Apache/bin directory. Upon successful you will get the message as below.
Installing the Apache 2.4 Service
The Apache 2.4 Service is successfully installed
You can see the service installed and ready for use.

If you want to uninstall, you can probably try out httpd.exe -k uninstall command
Once installed you can fix the errors you overcome by modifying errors to the actual.
Enable few of the information modules like below.
LoadModule status_module modules/mod_status.so
LoadModule info_module modules/mod_info.so
And Add corresponding IfModules for the same.
<IfModule status_module>
<Location /server-status>
SetHandler server-status
</Location>
</IfModule>
<IfModule info_module>
<Location /server-info>
SetHandler server-info
</Location>
</IfModule>
Lets start Apache WebServer and test it out.
http://localhost/ You should see something like below (I have modified a little to look like below)

Recently I had to take out sometime out of my very busy schedule :P and put myself into something which I was about to loose out on, well people must have tried this out, but I feel this is worth sharing. So lets start..!!
I have put forward simple and clear steps to setup HTTPd Server (Apache WebServer), Tomcat, Apache JMeter and Curl for Windows for testing the WebApplications Fault Tolerance mechanism.
Steps in brief :
- Install Apache WebServer
- Install Tomcat
- Integrate Apache with Tomcat
- Install Application and Access
- Install Apache JMeter and Carry out the Fault Tolerance Test.
- Optionally you can try out Curl for Windows.
1. Install the Apache WebServer
For installing Apache WebServer as usual you can go to the internet i.e. https://httpd.apache.org/download.cgi, however you will be shocked to see that there is no Windows download for latest Apache release.
You might want to visit the site : http://www.eu.apache.org/dist//httpd/binaries/win32 for more information
As per their suggestions, you may have to choose any one of the below options to download Apache distribution.
"Popular options for deploying Apache httpd, and, optionally, PHP and MySQL, on Microsoft Windows, include:
So I managed to download it from the second option i.e. Apache Lounge. Download the latest Apache release from there unzip it and copy it in your desired folder.


To Install Apache WebServer in Windows follow below instructions.
1) Unzip and copy it to your desired directory, modify the path values in httpd.conf file as per your requirement.
For Example : DocumentRoot "E:/MyLAB/FailoverTest/Apache24/htdocs"
2) Install the Apache WebServer as Windows Service.
Open CMD shell and run the command httpd.exe -k install in Apache/bin directory. Upon successful you will get the message as below.
Installing the Apache 2.4 Service
The Apache 2.4 Service is successfully installed
You can see the service installed and ready for use.
If you want to uninstall, you can probably try out httpd.exe -k uninstall command
Once installed you can fix the errors you overcome by modifying errors to the actual.
Enable few of the information modules like below.
LoadModule status_module modules/mod_status.so
LoadModule info_module modules/mod_info.so
And Add corresponding IfModules for the same.
<IfModule status_module>
<Location /server-status>
SetHandler server-status
</Location>
</IfModule>
<IfModule info_module>
<Location /server-info>
SetHandler server-info
</Location>
</IfModule>
Lets start Apache WebServer and test it out.
http://localhost/ You should see something like below (I have modified a little to look like below)
It works! I am Apache Server 2.4
You can try executing http://localhost/server-status and http://localhost/server-info to access the information, in case if you cannot make it to work, just drop me an comment on this post.
Your Apache WebServer is Ready..!!!
2. Setup Apache Tomcat WebServer
We are here to setup the load balancing Apache Tomcat Web Servers, So we may need to create three instances of tomcats to achieve High Availability/ Fault Tolerance / Failover Capability.
Download Apache Tomcat Server for windows from link : http://tomcat.apache.org/download-70.cgi

- Download the link mentioned under Core:
You can choose to download zip file, Unzip it and place it under desired directory.
You can rename it to NodeA and copy another directory and rename it to NodeB as I have done below.
Modify the server.xml file under NodeA/conf and change the port numbers so that they both should not conflict while running.
You might need to modify the port for HTTP Connector HTTP/1.1 Port, redirect port, shutdown port and AJP port so that both of the instances are intact while running in same host.
- For installing tomcat as Windows Service you can probably run below commands.
- Modify the service.bat file for below parameters to install tomcat as Windows service
- set SERVICE_NAME=Tomcat7-NodeX
set DISPLAYNAME=Apache Tomcat 7.0 %SERVICE_NAME% - Go to NodeX/bin and execute service.bat install
E:\MyLAB\FailoverTest\TomcatAppSrvr\NodeC\bin>service.bat install
Installing the service 'Tomcat7-NodeC' ...
Using CATALINA_HOME: "E:\MyLAB\FailoverTest\TomcatAppSrvr\NodeC"
Using CATALINA_BASE: "E:\MyLAB\FailoverTest\TomcatAppSrvr\NodeC"
Using JAVA_HOME: "C:\Program Files\Java\jdk1.8.0_20"
Using JRE_HOME: "C:\Program Files\Java\jdk1.8.0_20\jre"
Using JVM: "C:\Program Files\Java\jdk1.8.0_20\jre\bin\server\jvm.dl
l"
The service 'Tomcat7-NodeC' has been installed.
E:\MyLAB\FailoverTest\TomcatAppSrvr\NodeC\bin>
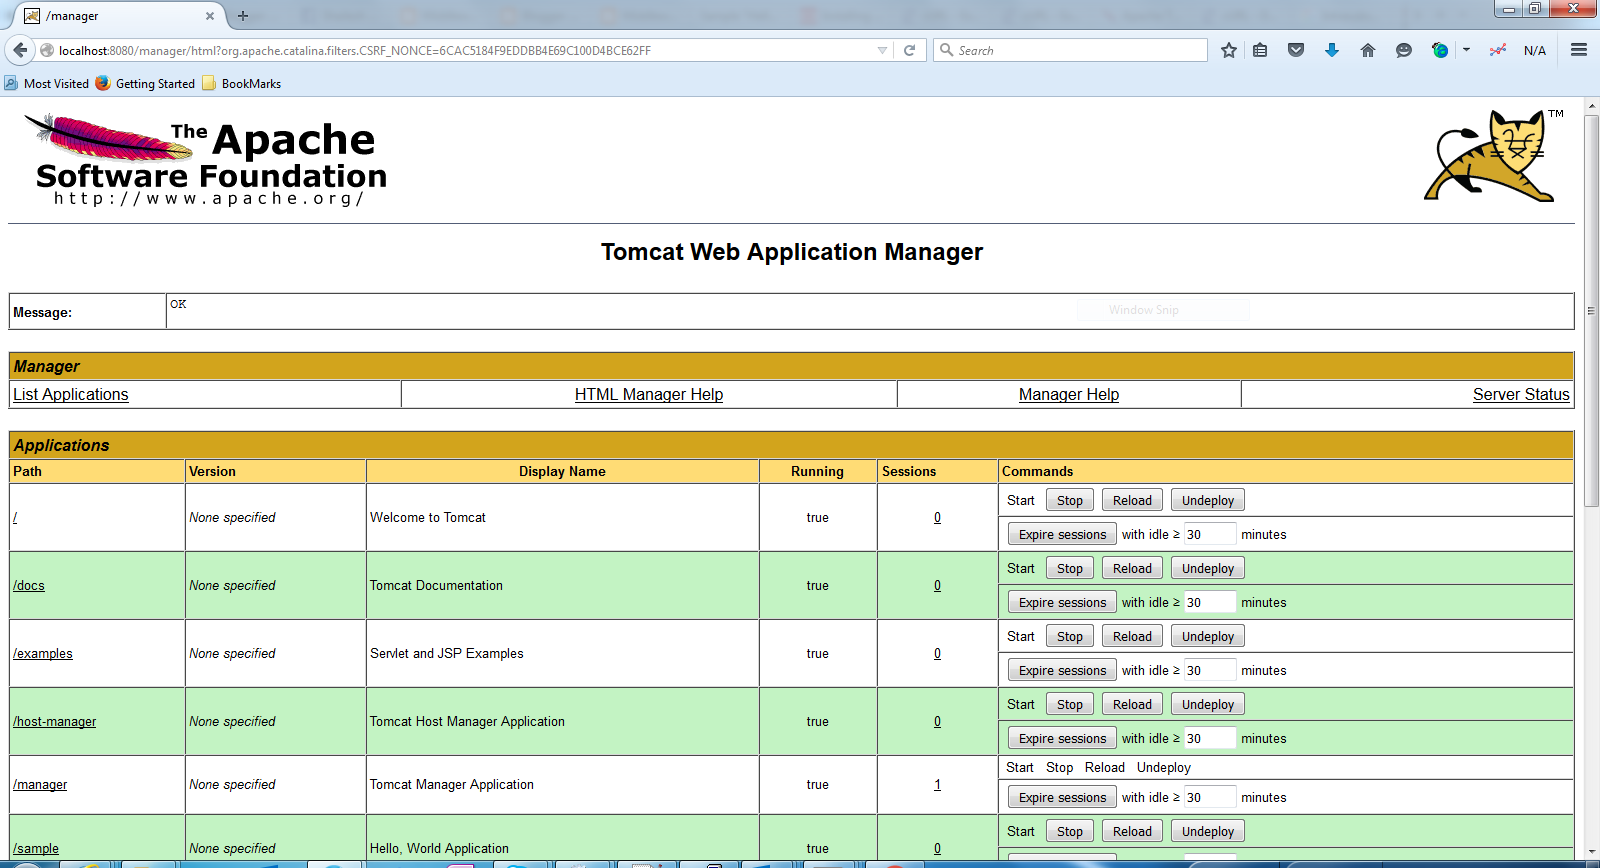
http://localhost:8080/manager to access the manager application for tomcat, you will probably want to enable the access to this application by modifying the tomcat-users.xml file under /NodeX/conf/ to below.
<tomcat-users>
<role rolename="tomcat"/>
<role rolename="role1"/>
<role rolename="manager"/>
<role rolename="manager-script"/>
<role rolename="manager-gui"/>
<user username="tomcat" password="tomcat" roles="tomcat"/>
<user username="both" password="tomcat" roles="tomcat,role1"/>
<user username="role1" password="tomcat" roles="role1"/>
<user username="admin" password="tomcat" roles="manager-gui,manager-script "/>
</tomcat-users>
Well after this you should be worried about how do I make Apache to talk to Tomcat? Turning brain question right? You just have to execute some more steps at both of the servers to achieve this.

1) Download the plugin file from : https://tomcat.apache.org/download-connectors.cgi

2) You can download one which is available for Windows.
3) Download and unzip the file mod_jk.so to Apache24/modules directory
4) Once copied add the below line to httpd.conf file found under Apache24/conf directory.
LoadModule jk_module modules/mod_jk.so
And enable this module in mod-jk.conf (create this file in Apache24/conf/extra directory) and include this in httpd.conf as below.
# Tomcat Integration Configuration
Include conf/extra/mod-jk.conf
Contents of this file is as below.
# Specify path to worker configuration file
JkWorkersFile E:/MyLAB/FailoverTest/Apache24/conf/workers.properties
# Configure logging and memory
JkShmFile E:/MyLAB/FailoverTest/Apache24/logs/mod_jk.shm
JkLogFile E:/MyLAB/FailoverTest/Apache24/logs/mod_jk.log
JkLogLevel info
# Configure monitoring
JkMount /jkmanager/* jkstatus
JkMount /sample/* loadbalancer
<Location /jkmanager>
Order allow,deny
Allow from all
</Location>
<Location /webapps/*>
Order allow,deny
Allow from all
</Location>
You can see that there are some application patterns are configured already, I have deployed the sample application so JkMount /sample/* loadbalancer /jkmanager Application is inbuilt and can be accessed by the jkstatus worker which is configured in another file called workers.properties which should be created by you in same directory : Apache24/conf/
Contents of the workers.properties are :
# Define worker names
worker.list=jkstatus,node1,node2,node3,loadbalancer
# Create virtual workers
worker.jkstatus.type=status
worker.jkstatus.read_only=true
worker.loadbalancer.type=lb
worker.loadbalancer.sticky_session=1
worker.loadbalancer.recover_time=120
# Declare Tomcat server workers 1 through n
worker.node1.type=ajp13
worker.node1.host=localhost
worker.node1.port=8009
worker.node1.lbfactor=1
worker.node2.type=ajp13
worker.node2.host=localhost
worker.node2.port=8010
worker.node2.lbfactor=1
worker.node3.type=ajp13
worker.node3.host=localhost
worker.node3.port=8011
worker.node3.lbfactor=1
# Associate real workers with virtual LoadBalancer worker
worker.loadbalancer.balance_workers=node1,node2,node3,lb
Well, I think I created lot of mess here, you must be out of track for that matter, let me clarify a little bit.
Basically, I am creating a configuration to integrate Apache Tomcat Server with Apache WebServer. Since I am using mod_jk module to configure, these all configurations are part of mod_jk module. Primarily we are calling mod_jk.so module in httpd.conf file and from there we are invoking its functionalities in mod-jk.conf file created under Apache24/conf directory. Which is included explicitly in httpd.conf as shown above.
We are mounting the application for respective workers to handle defined in workers.properties file in Apache24/conf directory.
# Configure monitoring
JkMount /jkmanager/* jkstatus
JkMount /sample/* loadbalancer
Then respective Locations and access control are configured for above applications are configured in same file.
<Location /jkmanager>
Order allow,deny
Allow from all
</Location>
<Location /webapps/*>
Order allow,deny
Allow from all
</Location>
Well now will jump to workers.properties file.
This file will show you the configuration regarding the Tomcat Instances (Nodes) for Load Balancing and Proxying.
worker.list will show you the list of instances or workers for mod_jk to handle the requests coming from Apache WebServer
worker.list=jkstatus,node1,node2,node3,loadbalancer
Here jkstatus worker is going to handle the requests pertaining to jkmanager application and can help http://localhost/jkmanager/ to work as defined in the mod-jk.conf file.
node1, node2 and node3 are the tomcat instances defined so that they can handle the requests independently however they are configured for loadbalancer workers too adding loadbalancer to worker list.
We are going to do one more trick here, just download a sample application from tomcat website at the URL : https://tomcat.apache.org/tomcat-6.0-doc/appdev/sample/ And deploy it in webapps directory of each tomcat.
And modify little of the HTML page available in sample application to represent the node name when it will be accessed.


1) Download the plugin file from : https://tomcat.apache.org/download-connectors.cgi

2) You can download one which is available for Windows.
3) Download and unzip the file mod_jk.so to Apache24/modules directory
4) Once copied add the below line to httpd.conf file found under Apache24/conf directory.
LoadModule jk_module modules/mod_jk.so
And enable this module in mod-jk.conf (create this file in Apache24/conf/extra directory) and include this in httpd.conf as below.
# Tomcat Integration Configuration
Include conf/extra/mod-jk.conf
Contents of this file is as below.
# Specify path to worker configuration file
JkWorkersFile E:/MyLAB/FailoverTest/Apache24/conf/workers.properties
# Configure logging and memory
JkShmFile E:/MyLAB/FailoverTest/Apache24/logs/mod_jk.shm
JkLogFile E:/MyLAB/FailoverTest/Apache24/logs/mod_jk.log
JkLogLevel info
# Configure monitoring
JkMount /jkmanager/* jkstatus
JkMount /sample/* loadbalancer
<Location /jkmanager>
Order allow,deny
Allow from all
</Location>
<Location /webapps/*>
Order allow,deny
Allow from all
</Location>
You can see that there are some application patterns are configured already, I have deployed the sample application so JkMount /sample/* loadbalancer /jkmanager Application is inbuilt and can be accessed by the jkstatus worker which is configured in another file called workers.properties which should be created by you in same directory : Apache24/conf/
Contents of the workers.properties are :
# Define worker names
worker.list=jkstatus,node1,node2,node3,loadbalancer
# Create virtual workers
worker.jkstatus.type=status
worker.jkstatus.read_only=true
worker.loadbalancer.type=lb
worker.loadbalancer.sticky_session=1
worker.loadbalancer.recover_time=120
# Declare Tomcat server workers 1 through n
worker.node1.type=ajp13
worker.node1.host=localhost
worker.node1.port=8009
worker.node1.lbfactor=1
worker.node2.type=ajp13
worker.node2.host=localhost
worker.node2.port=8010
worker.node2.lbfactor=1
worker.node3.type=ajp13
worker.node3.host=localhost
worker.node3.port=8011
worker.node3.lbfactor=1
# Associate real workers with virtual LoadBalancer worker
worker.loadbalancer.balance_workers=node1,node2,node3,lb
Well, I think I created lot of mess here, you must be out of track for that matter, let me clarify a little bit.
Basically, I am creating a configuration to integrate Apache Tomcat Server with Apache WebServer. Since I am using mod_jk module to configure, these all configurations are part of mod_jk module. Primarily we are calling mod_jk.so module in httpd.conf file and from there we are invoking its functionalities in mod-jk.conf file created under Apache24/conf directory. Which is included explicitly in httpd.conf as shown above.
We are mounting the application for respective workers to handle defined in workers.properties file in Apache24/conf directory.
# Configure monitoring
JkMount /jkmanager/* jkstatus
JkMount /sample/* loadbalancer
Then respective Locations and access control are configured for above applications are configured in same file.
<Location /jkmanager>
Order allow,deny
Allow from all
</Location>
<Location /webapps/*>
Order allow,deny
Allow from all
</Location>
Well now will jump to workers.properties file.
This file will show you the configuration regarding the Tomcat Instances (Nodes) for Load Balancing and Proxying.
worker.list will show you the list of instances or workers for mod_jk to handle the requests coming from Apache WebServer
worker.list=jkstatus,node1,node2,node3,loadbalancer
Here jkstatus worker is going to handle the requests pertaining to jkmanager application and can help http://localhost/jkmanager/ to work as defined in the mod-jk.conf file.
node1, node2 and node3 are the tomcat instances defined so that they can handle the requests independently however they are configured for loadbalancer workers too adding loadbalancer to worker list.
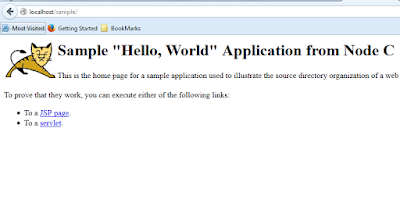
We are going to do one more trick here, just download a sample application from tomcat website at the URL : https://tomcat.apache.org/tomcat-6.0-doc/appdev/sample/ And deploy it in webapps directory of each tomcat.
And modify little of the HTML page available in sample application to represent the node name when it will be accessed.

- Once deployed start the server, you will see the war file will be extracted automatically and becomes exploded directory
- We can access this application at the URL : http://localhost:<tomcat_http_port_no>/sample/
- Sample URL is : http://localhost:8080/sample/
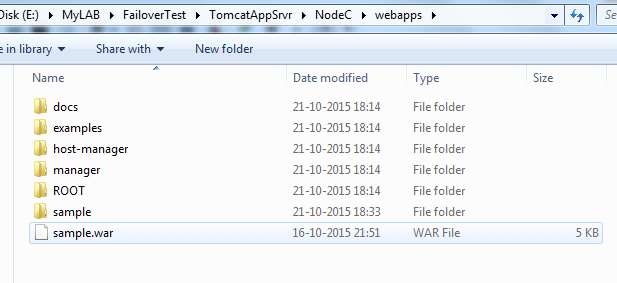
- Now Modify the application to represent the node identification
- Edit NodeC/webapps/sample/index.html file and modify the line to : <h1>Sample "Hello, World" Application from Node C</h1>
- Restart the Tomcat Server.
We are done with the configuration of Integration of Apache Tomcat and Apache WebServer.
Try accessing the application with Apache URL : http://localhost/sample/
Try accessing the application with Apache URL : http://localhost/sample/

lets install some crazy tools to work with our project.
- JMeter
- Curl
JMeter and Curl are used for WebSite Testing and Simulation purpose, JMeter is used as testing tool however curl you can use it like normal UNIX curl, this is just available for windows by some tricky ways.
You can download JMeter from : http://jmeter.apache.org/
Just download and copy it to desired directory and run the command jmeter.bat from the command window to start.
- This tool is used for creating the test uses cases for accessing the websites or many more things
- You can do lot of stuff in JMeter.
- Create a Thread group And Assign the iteration as shown in the picture
- Under the thread group, create HTTP Sampler as below.
- We can add the listeners to view the results in the XML, Tabular, Summery or tree format.


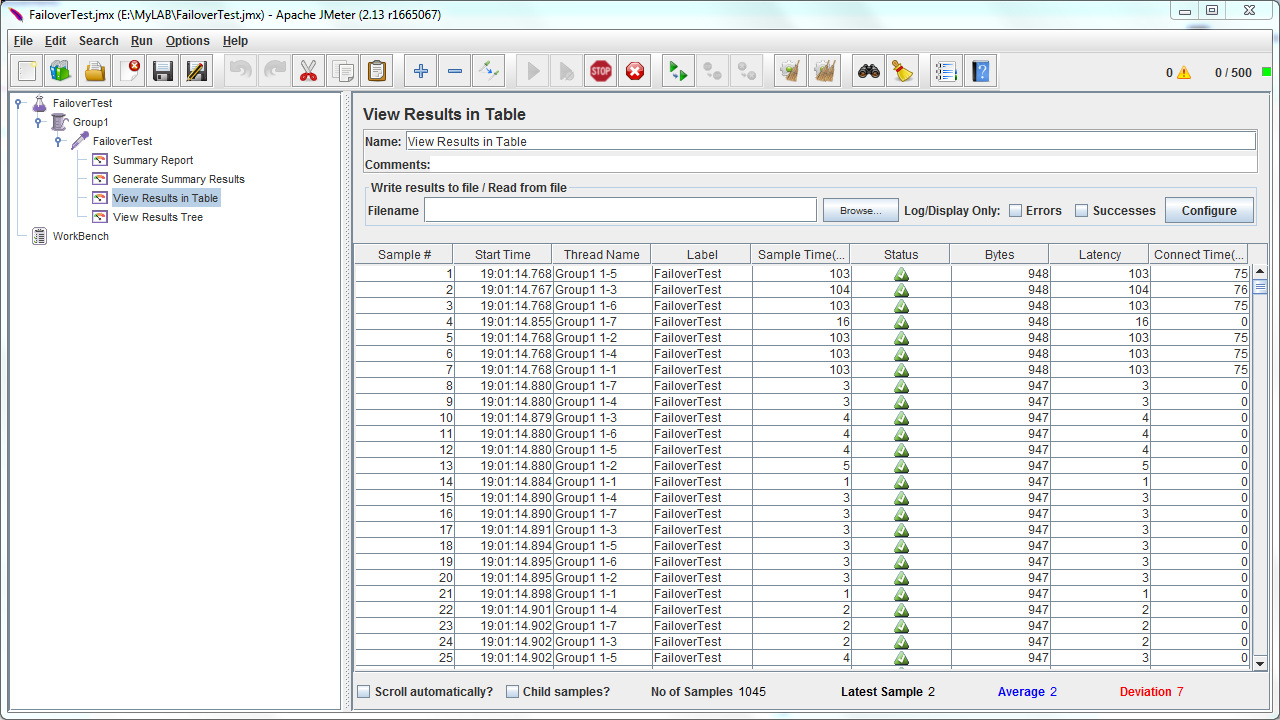
Once you run the configuration with 500 users for the period of 60 seconds looping for 5 times, JMeter will send 2500 requests within 60 Seconds to the Apache WebServer and show the results in listeners attached.
During this time you can test the Failover/Fault Tolerance Mechanism happening by shutting down one tomcat instance and testing fail-over behavior. During this time it should fail-over to the remaining servers which are available without failing the actual request.
You can get the detailed request/response headers and body in tree listener.
Lets try Curl :
Download the curl package from : http://curl.haxx.se/download.html
You will see something like : Download the marked one from the URL and save it to desired location.

Download the cacert.pem file from : http://curl.haxx.se/docs/caextract.html and copy it to the location where you have curl.exe file (under curl package you have already downloaded) and rename this file to :
curl-ca-bundle.crt

You can choose to Add the curl in PATH of the System Environment by choosing Environment variables and restart the command shell.
So we have done the curl setup.
Just try to execute curl --help you will see it working.
E:\MyLAB\FailoverTest\TomcatAppSrvr\NodeC\bin>curl --help
Usage: curl [options...] <url>
Options: (H) means HTTP/HTTPS only, (F) means FTP only
--anyauth Pick "any" authentication method (H)
-a, --append Append to target file when uploading (F/SFTP)
--basic Use HTTP Basic Authentication (H)
--cacert FILE CA certificate to verify peer against (SSL)
--capath DIR CA directory to verify peer against (SSL)
-E, --cert CERT[:PASSWD] Client certificate file and password (SSL)
--cert-type TYPE Certificate file type (DER/PEM/ENG) (SSL)
--ciphers LIST SSL ciphers to use (SSL)
--compressed Request compressed response (using deflate or gzip)
-K, --config FILE Specify which config file to read
--connect-timeout SECONDS Maximum time allowed for connection
-C, --continue-at OFFSET Resumed transfer offset
-b, --cookie STRING/FILE String or file to read cookies from (H)
-c, --cookie-jar FILE Write cookies to this file after operation (H)
--create-dirs Create necessary local directory hierarchy
--crlf Convert LF to CRLF in upload
--crlfile FILE Get a CRL list in PEM format from the given file
-d, --data DATA HTTP POST data (H)
--data-ascii DATA HTTP POST ASCII data (H)
--data-binary DATA HTTP POST binary data (H)
--data-urlencode DATA HTTP POST data url encoded (H)
--delegation STRING GSS-API delegation permission
--digest Use HTTP Digest Authentication (H)
--disable-eprt Inhibit using EPRT or LPRT (F)
--disable-epsv Inhibit using EPSV (F)
--dns-servers DNS server addrs to use: 1.1.1.1;2.2.2.2
--dns-interface Interface to use for DNS requests
--dns-ipv4-addr IPv4 address to use for DNS requests, dot notation
--dns-ipv6-addr IPv6 address to use for DNS requests, dot notation
-D, --dump-header FILE Write the headers to this file
--egd-file FILE EGD socket path for random data (SSL)
--engine ENGINE Crypto engine (SSL). "--engine list" for list
-f, --fail Fail silently (no output at all) on HTTP errors (H)
-F, --form CONTENT Specify HTTP multipart POST data (H)
--form-string STRING Specify HTTP multipart POST data (H)
--ftp-account DATA Account data string (F)
--ftp-alternative-to-user COMMAND String to replace "USER [name]" (F)
--ftp-create-dirs Create the remote dirs if not present (F)
--ftp-method [MULTICWD/NOCWD/SINGLECWD] Control CWD usage (F)
--ftp-pasv Use PASV/EPSV instead of PORT (F)
-P, --ftp-port ADR Use PORT with given address instead of PASV (F)
--ftp-skip-pasv-ip Skip the IP address for PASV (F)
--ftp-pret Send PRET before PASV (for drftpd) (F)
--ftp-ssl-ccc Send CCC after authenticating (F)
--ftp-ssl-ccc-mode ACTIVE/PASSIVE Set CCC mode (F)
--ftp-ssl-control Require SSL/TLS for ftp login, clear for transfer (F)
-G, --get Send the -d data with a HTTP GET (H)
-g, --globoff Disable URL sequences and ranges using {} and []
-H, --header LINE Custom header to pass to server (H)
-I, --head Show document info only
-h, --help This help text
--hostpubmd5 MD5 Hex encoded MD5 string of the host public key. (SSH)
-0, --http1.0 Use HTTP 1.0 (H)
--http1.1 Use HTTP 1.1 (H)
--http2.0 Use HTTP 2.0 (H)
--ignore-content-length Ignore the HTTP Content-Length header
-i, --include Include protocol headers in the output (H/F)
-k, --insecure Allow connections to SSL sites without certs (H)
--interface INTERFACE Specify network interface/address to use
-4, --ipv4 Resolve name to IPv4 address
-6, --ipv6 Resolve name to IPv6 address
-j, --junk-session-cookies Ignore session cookies read from file (H)
--keepalive-time SECONDS Interval between keepalive probes
--key KEY Private key file name (SSL/SSH)
--key-type TYPE Private key file type (DER/PEM/ENG) (SSL)
--krb LEVEL Enable Kerberos with specified security level (F)
--libcurl FILE Dump libcurl equivalent code of this command line
--limit-rate RATE Limit transfer speed to this rate
-l, --list-only List only names of an FTP directory (F)
--local-port RANGE Force use of these local port numbers
-L, --location Follow redirects (H)
--location-trusted like --location and send auth to other hosts (H)
-M, --manual Display the full manual
--mail-from FROM Mail from this address (SMTP)
--mail-rcpt TO Mail to this/these addresses (SMTP)
--mail-auth AUTH Originator address of the original email (SMTP)
--max-filesize BYTES Maximum file size to download (H/F)
--max-redirs NUM Maximum number of redirects allowed (H)
-m, --max-time SECONDS Maximum time allowed for the transfer
--metalink Process given URLs as metalink XML file
--negotiate Use HTTP Negotiate Authentication (H)
-n, --netrc Must read .netrc for user name and password
--netrc-optional Use either .netrc or URL; overrides -n
--netrc-file FILE Set up the netrc filename to use
-N, --no-buffer Disable buffering of the output stream
--no-keepalive Disable keepalive use on the connection
--no-sessionid Disable SSL session-ID reusing (SSL)
--noproxy List of hosts which do not use proxy
--ntlm Use HTTP NTLM authentication (H)
--oauth2-bearer BEARER XOAUTH2 Bearer Token (IMAP, POP3, SMTP)
-o, --output FILE Write output to <file> instead of stdout
--pass PASS Pass phrase for the private key (SSL/SSH)
--post301 Do not switch to GET after following a 301 redirect (H)
--post302 Do not switch to GET after following a 302 redirect (H)
--post303 Do not switch to GET after following a 303 redirect (H)
-#, --progress-bar Display transfer progress as a progress bar
--proto PROTOCOLS Enable/disable specified protocols
--proto-redir PROTOCOLS Enable/disable specified protocols on redirect
-x, --proxy [PROTOCOL://]HOST[:PORT] Use proxy on given port
--proxy-anyauth Pick "any" proxy authentication method (H)
--proxy-basic Use Basic authentication on the proxy (H)
--proxy-digest Use Digest authentication on the proxy (H)
--proxy-negotiate Use Negotiate authentication on the proxy (H)
--proxy-ntlm Use NTLM authentication on the proxy (H)
-U, --proxy-user USER[:PASSWORD] Proxy user and password
--proxy1.0 HOST[:PORT] Use HTTP/1.0 proxy on given port
-p, --proxytunnel Operate through a HTTP proxy tunnel (using CONNECT)
--pubkey KEY Public key file name (SSH)
-Q, --quote CMD Send command(s) to server before transfer (F/SFTP)
--random-file FILE File for reading random data from (SSL)
-r, --range RANGE Retrieve only the bytes within a range
--raw Do HTTP "raw", without any transfer decoding (H)
-e, --referer Referer URL (H)
-J, --remote-header-name Use the header-provided filename (H)
-O, --remote-name Write output to a file named as the remote file
--remote-name-all Use the remote file name for all URLs
-R, --remote-time Set the remote file's time on the local output
-X, --request COMMAND Specify request command to use
--resolve HOST:PORT:ADDRESS Force resolve of HOST:PORT to ADDRESS
--retry NUM Retry request NUM times if transient problems occur
--retry-delay SECONDS When retrying, wait this many seconds between each
--retry-max-time SECONDS Retry only within this period
--sasl-ir Enable initial response in SASL authentication
-S, --show-error Show error. With -s, make curl show errors when they occur
-s, --silent Silent mode. Don't output anything
--socks4 HOST[:PORT] SOCKS4 proxy on given host + port
--socks4a HOST[:PORT] SOCKS4a proxy on given host + port
--socks5 HOST[:PORT] SOCKS5 proxy on given host + port
--socks5-hostname HOST[:PORT] SOCKS5 proxy, pass host name to proxy
--socks5-gssapi-service NAME SOCKS5 proxy service name for gssapi
--socks5-gssapi-nec Compatibility with NEC SOCKS5 server
-Y, --speed-limit RATE Stop transfers below speed-limit for 'speed-time' secs
-y, --speed-time SECONDS Time for trig speed-limit abort. Defaults to 30
--ssl Try SSL/TLS (FTP, IMAP, POP3, SMTP)
--ssl-reqd Require SSL/TLS (FTP, IMAP, POP3, SMTP)
-2, --sslv2 Use SSLv2 (SSL)
-3, --sslv3 Use SSLv3 (SSL)
--ssl-allow-beast Allow security flaw to improve interop (SSL)
--stderr FILE Where to redirect stderr. - means stdout
--tcp-nodelay Use the TCP_NODELAY option
-t, --telnet-option OPT=VAL Set telnet option
--tftp-blksize VALUE Set TFTP BLKSIZE option (must be >512)
-z, --time-cond TIME Transfer based on a time condition
-1, --tlsv1 Use TLSv1 (SSL)
--trace FILE Write a debug trace to the given file
--trace-ascii FILE Like --trace but without the hex output
--trace-time Add time stamps to trace/verbose output
--tr-encoding Request compressed transfer encoding (H)
-T, --upload-file FILE Transfer FILE to destination
--url URL URL to work with
-B, --use-ascii Use ASCII/text transfer
-u, --user USER[:PASSWORD] Server user and password
--tlsuser USER TLS username
--tlspassword STRING TLS password
--tlsauthtype STRING TLS authentication type (default SRP)
-A, --user-agent STRING User-Agent to send to server (H)
-v, --verbose Make the operation more talkative
-V, --version Show version number and quit
-w, --write-out FORMAT What to output after completion
--xattr Store metadata in extended file attributes
-q If used as the first parameter disables .curlrc
Sorry for this, its a hell lot of output. :D
lets start our test.
Lets batch the script for curling the URL http://localhost/sample/ -- CurlLoop.bat file
:loop
curl http://localhost/sample/
timeout /T 1
goto loop
curl http://localhost/sample/
timeout /T 1
goto loop
Run this script at the command shell, while it is running shutdown one of the tomcat instance.

- This will loop through all servers in Round Robin Fashion
- Once we kill any of the servers (Tomcat) it will skip the killed one and loop through other two servers in round robin fashion.
- I have killed the NodeA and Curl is looping through NodeB and NodeC

- Now Start the shutdown tomcat instance and see what happens.
- Apache will wait for the recover time once the tomcat started and start hitting the new tomcat node
Settings below take into effect here for effective failover mechanism.
worker.loadbalancer.sticky_session=1
worker.loadbalancer.recover_time=120
worker.loadbalancer.recover_time=120
sticky_session=1 option will make sure the requests are sent to the same server until there is a new fresh request.
recover_time=120 option will make sure that mod_jk will wait for 12o seconds till it checks for the next available worker process once it gets started, basic phenomenon here is to make sure your tomcat instance is completely available during this time so that its ready to serve incoming requests without any errors.
So once you start the tomcat back, after 120 seconds you should see Apache sending the requests to brought up node also.
Hence Proved...
Shoot comments or emails in case if you have any doubts or difficulties achieving this.
Regards
Shailesh Dyade.